|
|
|
|
|
|
1.
|
Background
|
|
2.
|
About
National Informatics Centre
|
|
3.
|
e-Filing system
|
|
4.
|
Benefits to the dealer
|
|
5.
|
Process of submission
|
|
6.
|
Requirements
|
|
7.
|
Getting login account
|
|
8.
|
First time logging in
|
|
9.
|
Regular Logging in
|
|
10.
|
The Options in e-filing
|
|
11.
|
Purchase Invoices
|
|
12.
|
Sale Invoices
|
|
13.
|
Statutory Forms
|
|
14.
|
Export Invoices
|
|
15.
|
Returns
|
|
|
|
|
1.
|
Background
|
|
|
Commercial
Taxes Department (CTD) is using the e-governance system known as VATsoft with
the software support from NIC Bangalore. Using VATsoft, the CTD is
effectively maintaining the documents of the VAT dealers so that the
department can provide better services to the dealers as and when dealers
request. This also helps both the parties to build mutual trust and
confidence in carrying out their activities.
CTD has requested NIC to develop an e-filing system for VAT
related activities. After going through the requirements, NIC has
developed the system, called as ‘VAT e-Filing System’.
This
manual is meant for use by VAT dealers. Users of the VAT
e-filing system should have working knowledge of computers and well versed
with the maintenance of different kinds of registers under the VAT Act.
The
purpose of this document is to provide an interface between the dealers
and the VAT e-filing system. It will help them to understand the usage of
the e-filing system for electronic filing of VAT documents. This
manual also explains the workflow involved in carrying out electronic
submission of the VAT documents by the dealers.
|
|
|
 Top Top
|
|
2.
|
About
National Informatics Centre (NIC)
|
|
|
National
Informatics Centre (NIC), Department of Information Technology, Ministry
of Communication & IT, Government of India, is a premier organization
in the field of Technology and provides state-of-the-art solutions to the
information management, dissemination, e-Governance and decision support
requirements of the Government and corporate sector. NICNET, with its
Nationwide Network of state-of-the-art technology, computers,
communication equipments and expert IT specialists, is well rooted and
functioning at all Districts, State/ Union Territory Capitals and Central
Government and helping information exchange of vital nature. With its
Master Earth Station at New Delhi, micro earth station nodes have been
established in all the State Capitals, District Head Quarters and select
commercial centers.
The
broad range of services being provided by NIC, includes system study,
design, coding, testing, training, implementation, software maintenance
and hand holding support. NIC has designed and developed a number of
e-governance systems for the State Government.
|
|
|
Top
|
|
3.
|
VAT e-Filing System
|
|
|
The Department is happy to introduce VAT e-filing system for VAT dealers. e-filing is an internet/web based system, where in the
dealers can submit important documents of VAT on this system.
In
this system, the dealer can submit the details of purchase invoices, sale
invoices and CST statutory forms. They can also view various documents/records
maintained by the department. Dealer has provision to enter directly the
documents or upload the files from his system.
TIP: In case of any problem, please contact the PRO
|
|
|
Top
|
|
4.
|
Benefits
to the Dealer
|
|
|
Entering
and submitting the VAT documents through VAT e-filing system will benefit
the dealer. The Department will be able to process the request for issue of
fresh CST statutory forms faster when the dealer submits the utilization
& receipt reports of CST statutory forms on e-filing system. In
respect of submission of purchase and sale invoices, the system validates
the TINs of both the seller and the buyer from the departmental dealer
master and tells about the invalid TIN’s of purchaser/seller. This avoids
unnecessary queries from the Departmental officers while conducting audit
and inspection.
The
system will also display details of pending documents/payments of a
dealer so that the dealer can take appropriate steps to avoid penalty and
interest. Proper and in-time submission of documents through VAT e-filing
system would avoid taking up audit and inspection work by the department
in most cases.
This system helps the department to check the
records of the dealers without asking them repeatedly to produce it
before the officers of the department. The e-filing system has been
designed and developed in such a way that it will help the dealer to view
his records maintained and processed by the department.
TIP: Help us to
serve you better.
|
|
|
Top
|
|
5.
|
Process of Submission
|
|
|
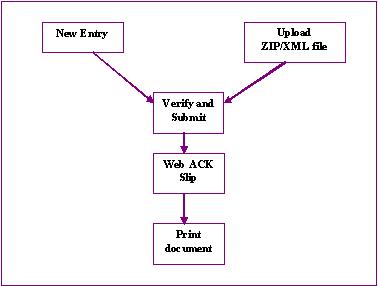
The following steps have to be followed to complete
the submission process:
1. New Entry:
Provision has been made to enter the document details directly using the
data entry screen provided in the web-site. The dealer, who has not
computerized his business and hence cannot upload XML file, can use this
option.
2. Upload XML/ZIP File: The dealer who has computerized
his business activity can use this option to upload the XML file.
However, the dealer has to prepare his XML file as per the XML format
provided by the department. System will not read the XML file if there is
any variation in the format. In case the XML file is more than 3Mb then
the file can be split into 2 or more files. The size of the split file
should be less than 3 Mb. Dealer on the other hand can ZIP the XML file
and upload the same.
3. Delete All Invoices – If the dealer feels that the
XML file uploaded or invoices entered for a month is not valid, he can
use the ‘Delete all invoice’ option which deletes all the invoices
entered for the month.
4. Verify and Submit: After entering the details
directly or uploading the XML file successfully, the dealer has to verify
the details and submit the document to the department. If any error is
noticed, the dealer can go back to entry screen and correct the details
and submit the details.
5. Web ACK SLIP: Once the document is submitted,
the system generates the ACK SLIP. This is the proof of submission of
document by the dealer to CTD.
6. Print document: After submission of the
document, dealer has to generate the print out of the document and submit
the hard copy to the department along with the return or any other
request application as required.
|
|
|
Top
|
|
6.
|
Requirements
|
|
|
The
followings are the minimum hardware & software required at the user
level to use the e-filing system.
· Client system with at least Pentium and 2 GB HDD and
64 MB RAM or above
· Dot Matrix or Laser Printer
· 700 VA UPS
· Internet connection
· Operating system with browser
|
|
|
Top
|
|
7.
|
Getting
login account
|
|
|
The
dealer has to request the concerned office for the
account in VAT e-filing system. After scrutinizing the request, officer will forward
the application to the headquarters. After processing the application,
the department will send the username and password to the dealer through
courier/post. It is important for the dealer to maintain username and
password securely and confidentially so as avoid being misused.
TIP: Maintain the username and password securely.
Don’t share it with anybody. Ensure that only authenticated person uses
this to work on the VAT e-filing system.
|
|
|
Top
|
|
8.
|
Logging
in
|
|
|
Once
user enters the URL address given by the Department
on the internet browser, the
system asks for the username and password. Once user enters his username
and password correctly, system shows the main page of the
e-filing system. Otherwise it says login failed.
User
can see his username and Trade name on the top. The user can use the
‘sign out’ option, which is there on top right corner, to log out from
this system.
TIP: Keep on
changing your password frequently, at least once in 30-45 days and maintain/remember
the password.
|
|
|
Top
|
|
9.
|
First
time logging in
|
|
|
When
the first time user logs into the system successfully using the
department given username and password, he will be displayed with the new
screen, requesting to give his choice of username and password. The user has to enter his choice of the username of
at least 5 characters, and password of at least 8 characters containing
combination of alphabets (A-Z, a-z), numerals (0-9) and some special
characters (@,#,$,%,*,^). User has to enter his password 2 times.
Thereafter when he clicks the CREATE button, system generates the new
username if it is not already existing in the system.
TIP: Remember
to change the password of your account, whenever the authorized person,
who is operating the VAT e-filing system, resigns/retires from your
company/office/shop.
|
|
|
Top
|
|
10.
|
Options
|
|
|
The user will be shown with
the following main page ,
when his login is successful. The
page has various options for user to view and update the data.
TIP: Every time
check the last login date and time to ensure that nobody is using your
account without your knowledge.
The
following options are available in this main page.
· Purchase Invoice –
Here dealer can enter, upload, submit and print the purchase invoice
details
· Sale Invoice – Using this,
dealer can enter, upload, submit and print the sale invoice details
· CST Statutory Forms -
Here dealer can enter, upload, submit and print statutory forms details
· Export Invoice - Here
dealer can enter, upload, submit and print export invoice details
· Return Details - Dealer
can upload and submit the return details for a month and print return
details
· Change Password –
Dealer can change the password of his username
· TIN search – Based on
the TIN, dealer can get the name and address of the any dealer
· Commodity List –
Dealer can see the commodity list
· Office details – Office name and address can be seen.
· Instructions/Guidelines
– About how to use the VAT e-filing system
· Update Contact Info –
Here Dealers can update initially entered contact information.
· XML file format –
Format of XML files
· Download Converter –
Dealer can download the tool to convert the excel file to XML file.
· FAQ – Shows details
to the dealer about e-filing in a Question and Answer format.
TIP: Remember to sign out/logout from the system after completion of your
work.
|
|
|
Top
|
|
11.
|
Purchase
Invoices
|
|
|
The
VAT e-filing system has provision to enter or update the purchase
invoices details. The details of the purchase invoices to be submitted,
are those based on which the dealer has claimed the input tax credit
(ITC). Purchase invoice menu has the following options:
1. New Entry
2. Upload ZIP/XML file
3. Delete All Invoices
4. Verify and Submit
5. Print
|
|
|
11.1
New Entry
Using the new entry option, the dealer can directly enter
the purchase invoices details from his register. When the dealer clicks
on the ‘NEW ENTRY‘option, he
has to enter the return period (or tax Period) for which the purchase
invoices are being entered. The return period (or tax Period) has to be
entered by selecting monthly/quarterly
and the correct period. After entering
the return period, user has to click ‘GO’ button. If purchase invoices entries are already
available in the system for that return period, system shows those
details. Here user can modify, delete or add the entries. If there are no
purchase invoices entries in the system, it will inform the user and asks
him to click ’NEW ENTRY’ button to
confirm to continue to enter the details.
The dealer can enter the purchase invoice details
like Serial no, Seller’s TIN, Seller’s name and address, Invoice no,
Invoice date, Invoice value (net of tax) and Tax charged and click on ’ADD’ button to save the entries. If the invoice number
starts with ‘DB’ (eg: DB89087), then system accepts –ve values for the
Net Value and Tax charged fields. In the case of Sales Invoices the
invoice number can start with ‘CR’ e.g.: CR0988 to accept the – ve values
in Net value and tax charged fields) This record will come in the left
hand bottom grid. Likewise one by one, all the entries can be added. As
and when the invoices are entered, based on the Invoice date, the counts
will either increase or decrease at the left hand bottom grid. If the
invoice dates are many in number, then the left bottom grid is paginated
with numbers like 1, 2, 3… at the bottom of grid. When user clicks on
these numbers, the corresponding records of that page are displayed. On
clicking any one row of the left hand side grid, another grid is
displayed on the right which has the details of invoices entered for the
selected date. The grid contains rows which is equal to that of the total
invoice count in the left hand grid. To correct/delete the already
entered details, check on the ‘SELECT’ option in the right hand side grid, corresponding
to that entry. After correction click ’ADD’ to save or click ’DELETE’ to delete the entry. System will alert the dealer
if the seller’s TIN is not available in the departmental dealer master
file. Dealer can check up and effect correction if required. System
accepts an invoice date which is not less than 6 months of the return
period. System limits the size of name and address of seller to 30
characters of alphanumeric only. Special characters are not allowed here.
System will alert the dealer if the seller’s TIN is
not available in the departmental dealer master file. You can check up
and effect correction if required. System will also alert if the invoice
date is not matching with the return period selected. However it will
allow the dealer to enter the purchase invoice details of last few days
of immediate previous month of return period. System limits the size of
name and address of seller to 30 characters of alphanumeric only. Special
characters are not allowed here.
TIP: Ensure that invoice number is entered as it is
mentioned in the sale/purchase invoice. That is, if invoice number has
alphanumeric value, enter as it is. For example: A1234, B/2345 etc.
TIP: Ensure that no special characters are entered in
seller/purchasers name and address.
|
|
|
11.2 Upload ZIP/XML File:
The e-filing system provides for option to upload
the purchase invoices details in XML file. The dealer who has already
computerized his accounts can use this option. He has to pick up the
purchase invoices details in the XML file or the ZIP file of the XML
file, from his system and upload to VAT e-filing system. This will avoid
the process of entering all the purchase invoices to e-filing system.
TIP: If you have computerized your accounts of
purchases and sales, request your Administrator/Software
provider/Consultant to give a solution to convert your purchase invoices
data into XML file as required by the department.
When user clicks the ’UPLOAD
ZIP/XML FILE’ option, user has to enter the return period for
which entries are being uploaded. Then he has to browse the ZIP/XML file
from his system. Thereafter click on ’UPLOAD’ button, to upload the file. If the file is not a
ZIP/XML, then it will not upload and warns the user. After successfully
uploading XML file systems indicates the same with a message that ‘File
uploaded successfully’. User has to click on ‘VALIDATE
XML’ button to verify the
correctness of format of XML file or the contents of the XML file in ZIP
File so that data can be read and saved. If it is read successfully, the
system indicates by enabling the ‘SAVE’ button else displays the error message.
TIP: Ensure that the structure and format of XML is
followed to upload the XML file.
If any serious (fatal) error is noticed in the data,
system will not allow saving the data. If no serious (fatal) errors are
there, then it will allow for saving the details. The button for saving
is available at the bottom. System also shows other minor errors, if any,
with each entry so that after saving, these errors can be corrected in
New Entry option. Like wise any number of XML /ZIP Files can be uploaded
for a period. But once verified and submitted, the user cannot upload any
further files for the period.
|
|
|
11.3
Verify and Submit
Using this option, user can verify the details and
submit the document to the department. On click of ‘VERIFY
AND SUBMIT’ option, user has to
enter the return period. Once the return period (or tax period) is
entered, system shows the entry-wise details of invoices and finally,
summary of the entries.
After verifying the details, the user has to click ‘SUBMIT’ button to forward the entries to department. If
user needs some correction in the entries, he can go back to new entry
option to correct the details. Once user submits the document, he cannot
do any corrections to the entries.
TIP: Verify the records/details before submitting.
After submitting the details, the system generates
the ‘WEB ACK SLIP’. User
can take the printout of the same.
TIP: Once the invoice details are submitted, you
cannot change the entries. Subsequently if you notice the mistakes,
inform the changes in the hard copy of the document to the concerned office.
|
|
|
11.4
Print
User has been provided with the option to generate
the printout of the entries by clicking print option.
Here the system asks user to enter the return
period. Thereafter it shows all the entries of that return period,
entered/uploaded by the user. User can take the printout of the same.
TIP: Submit the signed hardcopy of ACK SLIP and document from the
e-filing system
for further processing, if it has not
been signed digitally.
|
|
12.
|
Sale Invoice
|
|
|
The entering, uploading and
submitting of the taxable sale invoices (tax invoices) is very similar to
the procedure followed for entry of purchase invoices. The same process
is to be followed.
|
|
|
|
|
13.
|
CST
Statutory Forms
|
|
|
User
can also enter, upload and submit the details of transactions carried out
on the Statutory Forms on the same lines. Here system asks the user to
enter the Serial Number of the Statutory Forms and details of
seller/buyer and invoice-wise details.
|
|
14.
|
Export Invoice
|
|
|
The entering, uploading and
submitting of the export invoices (tax invoices) is very similar to the
procedure followed for entry of purchase invoices. The same process is to
be followed.
|
|
15.
|
Returns
|
|
|
Dealers
can upload and submit the returns for a month and print the return details
in Form VAT 100
|
|